This article provides a comprehensive guide to mastering Gmail rules, covering their importance for email organization, types of rules, step-by-step setup, troubleshooting common issues, and the benefits of automating your inbox for enhanced productivity.
Mastering Gmail Rules: A Comprehensive Guide to Automating Your Inbox
Introduction to Gmail Rules: Understanding the Importance of Email Organization
Gmail rules setup is essential for anyone looking to maintain a clean and organized inbox. With the sheer volume of emails many people receive daily, having a systematic approach can save time and reduce stress. Gmail rules allow users to automate email management, ensuring important messages are prioritized while less crucial ones are filtered away. This organization is not just about aesthetics; it enhances productivity. Imagine walking into a cluttered office versus a neatly arranged workspace. The latter fosters focus and efficiency. Similarly, a well-managed inbox allows users to locate important emails swiftly and respond without delay.
By implementing Gmail rules, users can achieve a sense of control over their email flow. They can designate emails from specific senders to go directly to designated folders, label emails based on content, or even delete unwanted messages automatically. This process not only declutters the inbox but also optimizes the email experience, making it less overwhelming. In essence, mastering Gmail rules is about transforming chaos into order, allowing users to concentrate on what truly matters.
Types of Rules You Can Create in Gmail: A Breakdown of Options
When it comes to Gmail, there are several types of rules users can create to enhance their email management. Understanding these options is crucial for tailoring your inbox to fit your specific needs. Here’s a breakdown of some common types of Gmail rules:
- Filter by Sender: This rule automatically sorts emails from specific addresses into designated folders. For instance, emails from your boss can go directly into a “Work” folder.
- Keyword Filters: Emails containing certain keywords in the subject line or body can be automatically labeled or moved. This is handy for sorting newsletters or promotions.
- Date Filters: Users can create rules that manage emails based on dates. For example, all emails older than a month can be archived automatically.
- Size Filters: This helps manage storage by filtering emails that exceed a certain size, allowing users to delete or archive them as needed.
- Spam Filters: Automatically mark emails as spam based on specific criteria, preventing unwanted messages from cluttering the inbox.
These types of rules not only enhance organization but also improve efficiency. By understanding and utilizing these options, users can create a personalized email management system that meets their unique requirements. The ability to automate email sorting is a game-changer, allowing individuals to focus on more pressing tasks without being bogged down by a messy inbox.
Step-by-Step Guide: How to Create Gmail Filters for Automatic Email Management
Creating Gmail filters is a straightforward process that can significantly improve email organization. Follow this step-by-step guide for Gmail rules to set up your filters effectively:
- Log into Your Gmail Account: Start by logging into your Gmail account on a web browser.
- Access Settings: Click on the gear icon in the top right corner and select “See all settings” from the dropdown menu.
- Navigate to Filters and Blocked Addresses: Find the “Filters and Blocked Addresses” tab. This is where you can view existing filters and create new ones.
- Create a New Filter: Click on “Create a new filter”. A dialog box will appear where you can set criteria for the filter.
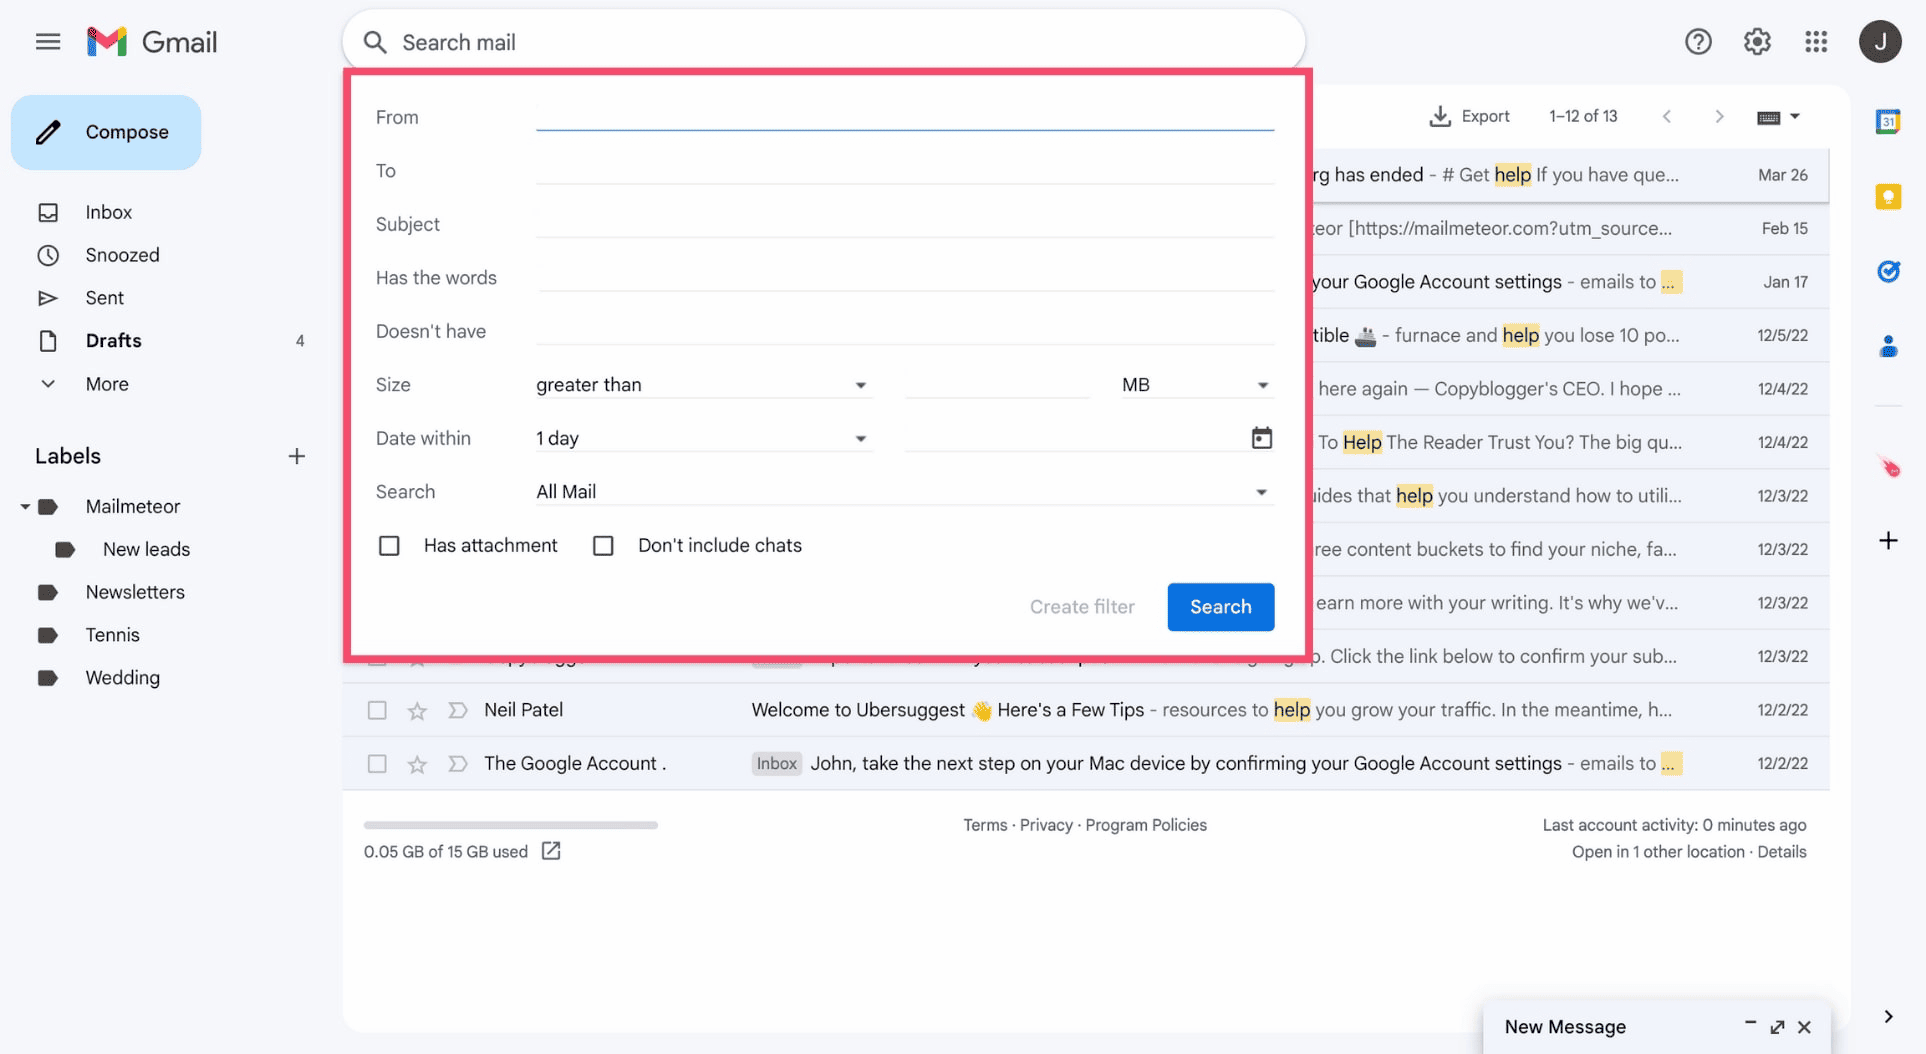
- Set Filter Criteria: Enter specific details such as sender’s email, keywords, or other criteria that will trigger the filter.
- Choose Action: After setting the criteria, click “Create filter”. You will then choose actions such as “Skip the Inbox (Archive it)”, “Apply the label”, or “Delete it”.
- Finalize the Filter: Once you’ve chosen your actions, click “Create filter” again to finalize. Your filter is now active!
Following these steps will help you filter emails in Gmail automatically, streamlining your inbox management. Regularly reviewing and updating your filters ensures they remain relevant as your email needs change. This proactive approach to email organization can save you time and keep your inbox clutter-free.
Filtering Emails Automatically: How to Set Criteria for Your Gmail Rules
Gmail rules setup involves more than just creating filters; it requires setting specific criteria to ensure the right emails are managed effectively. To filter emails automatically, users can define various parameters that match their needs. Here’s how to set criteria for your Gmail rules:
- Sender’s Email Address: You can filter emails from specific senders. For instance, if you receive newsletters from multiple sources, you can set a rule to direct all emails from those addresses into a dedicated folder.
- Keywords: Using keywords in the subject line or email body helps categorize emails. If you often receive project updates, set a rule to filter emails containing “Project” into a specific label.
- Timeframes: Consider filtering emails based on their age. For instance, you might want to archive any emails older than 30 days automatically. This keeps your inbox fresh and uncluttered.
- Attachments: You can filter emails that contain attachments. This is useful if you want to keep track of files sent to you without having to sift through unrelated emails.
- Size: Setting a filter based on email size can help manage your storage. You can automatically delete or archive emails larger than a certain size.
By defining these criteria, users can streamline their email management process significantly. It’s important to regularly review and adjust these rules as your email habits change. Doing so enhances productivity, making your inbox a tool for efficiency rather than a source of stress.
Practical Examples of Gmail Rules: Real-Life Applications
Understanding how to create Gmail filters is one thing, but seeing practical examples helps solidify the concept. Here are some real-life applications of Gmail rules:
- Work Emails: Automatically direct emails from your supervisor to a “Work” folder. This way, you won’t miss important updates amidst personal emails.
- Newsletters: Filter promotional emails into a separate label called “Promotions.” You can check this folder at your convenience without cluttering your main inbox.
- Project Management: Use keywords like “Deadline” or “Meeting” to filter related emails to a dedicated folder. This keeps all project-related communications organized.
- Social Media Notifications: Automatically filter notifications from social media platforms into a specific label. This ensures you receive alerts without distractions from your main emails.
- Spam Control: Set rules to mark emails from known spam sources as spam automatically. This reduces the risk of clutter and enhances your email security.
These examples illustrate the versatility of Gmail rules. Implementing such filters not only keeps your inbox organized but also improves your overall email management experience. By utilizing Gmail filters creatively, you can tailor your inbox to match your personal and professional needs.
Editing and Deleting Existing Rules: Keeping Your Gmail Organized
As your email habits evolve, you might find the need to edit or delete existing rules. Knowing how to manage these rules is essential for maintaining an organized Gmail account. Here’s how you can edit or delete your Gmail rules:
- Access Your Settings: Log into your Gmail account and click the gear icon to access the settings menu.
- Go to Filters: Select the “Filters and Blocked Addresses” tab. Here, you’ll see a list of all your existing filters.
- Edit a Filter: To modify a filter, click on “edit” next to the desired rule. You can change the criteria or actions as needed.
- Delete a Filter: If a rule is no longer relevant, click “delete” next to the filter. This helps keep your setup clean and functional.
- Save Changes: After editing, always remember to save your changes to ensure the updates take effect.
Regularly reviewing and adjusting your Gmail rules can lead to a more streamlined email experience. By keeping your filters up to date, you can manage your incoming emails effectively, ensuring that your inbox remains organized and efficient.
Troubleshooting Common Issues: What to Do When Gmail Rules Don’t Work
Gmail rules setup can sometimes be a bit tricky, and users may encounter issues where their rules don’t function as intended. Here are some common problems and how to troubleshoot them:
- Rule Not Applying: If a rule isn’t applying to incoming emails, first check if the criteria are set correctly. Make sure the sender’s email address or keywords match exactly. Gmail is case-sensitive, so check for variations in spelling or casing.
- Conflicting Rules: Sometimes, multiple rules can conflict. Review your rules to see if one rule is overriding another. Prioritize them by changing their order if necessary.
- Filters Not Saving: If you find that your filters are disappearing, ensure that you are saving changes correctly. After editing or creating a filter, always click the “Save” button.
- Gmail Limitations: Be aware of Gmail’s limitations, such as the maximum number of filters allowed. If you exceed this limit, older filters may stop functioning. Regularly clean up unused rules.
- Account Sync Issues: If you’re using Gmail on multiple devices, sync issues can occur. Ensure your Gmail account is synced properly across devices. Sometimes logging out and back in can resolve syncing problems.
By following these troubleshooting steps, users can effectively manage their Gmail rules and resolve common issues. Regularly reviewing rules and their performance ensures a smoother email management experience.
Time-Saving Benefits of Gmail Rules: Enhancing Your Email Workflow
Utilizing Gmail rules significantly enhances email workflow and saves time. Here’s how implementing these rules can benefit users:
- Automated Organization: Gmail rules automatically sort incoming emails, which means users can focus on important messages without manually organizing their inbox. This automation leads to a more streamlined email experience.
- Reduced Clutter: By filtering out promotional emails and newsletters, users can maintain a cleaner inbox. This reduction in clutter not only improves visibility but also decreases the time spent searching for essential emails.
- Increased Productivity: With an organized inbox, users can respond to critical messages faster. This increase in efficiency leads to enhanced productivity, allowing for more time to focus on tasks that matter.
- Customizable Experience: Users can tailor their Gmail experience to fit personal or professional needs. Creating specific filters for different projects or clients allows for better email management.
- Quick Access to Information: Using labels and filters enables users to access relevant information quickly. This is especially useful during busy periods when time is of the essence.
Incorporating Gmail rules into daily email management can transform how users interact with their inboxes, ultimately leading to a more efficient and organized workflow.
Conclusion: Streamlining Your Gmail Experience with Effective Rules
Mastering Gmail rules is essential for anyone looking to enhance their email organization. By understanding the various types of rules, creating effective filters, and troubleshooting common issues, users can significantly improve their email management experience. The ability to automate sorting, manage incoming emails, and customize filters provides a powerful tool for maintaining a clutter-free inbox.
Incorporating these rules not only saves time but also fosters a more productive environment. As email continues to be a primary form of communication, leveraging Gmail rules will help users stay organized, focused, and efficient in their daily tasks. Ultimately, effective email management is about reclaiming control over one’s inbox, allowing for a smoother workflow and a less stressful email experience.


